Raspberry Pi
Autoren: Fawad Murad
Betreuer: Prof. Schneider
Art: Praxissemester
Projektlaufzeit: 02.11.2021 - 20.02.2022
Introduction
The Raspberry Pi is a single computer the size of a credit card. It features an ARM/Broadcom SoC with a GPU, RAM, and wireless and cable communication options. In some ways, it's that straightforward: the Raspberry Pi is just a small computer. However, it is not so straightforward in another manner. The Raspberry Pi is a very adaptable platform that allows you to build whatever you desire.
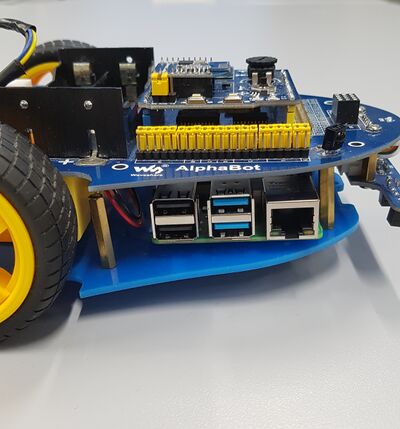
Initially, we got the AlphaBot with an Arduino attached to it and then we replaced Arduino with a Raspberry Pi 4 and used or programmed it accordingly. In this article, the idea of using Raspberry Pi 4 instead of Arduino IDE with Alphabot is introduced. Like, how different tools make the Raspberry Pi 4 to control and work with Alphabot. Before we go further, let us take a closer look at the difference between these two boards, Arduino IDE and Raspberry Pi. Then, I will discuss on the installation of required softwares and role of GPIO pins to control the hardware.
Arduino
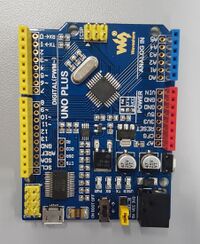
Arduino is a development board that uses a microcontroller. Arduino UNO uses the ATmega328P microcontroller, which is based on Atmel microcontrollers. The Processor, RAM, and ROM are all contained in the Microcontroller on the Arduino Board (such as the ATmega328P). Supporting hardware (for power and data) and GPIO pins are included on the board. Arduino was built from the ground up as open-source hardware and software. The hardware and software of Arduino are both easily accessible. There is no need for an operating system because it is a Microcontroller. To connect to the internet using Arduino, you'll need an extra module or shield. In the case of Arduino, there is no wireless connectivity (at least on board). C or C++ programming languages can be used to programme Arduino.
Raspberry Pi
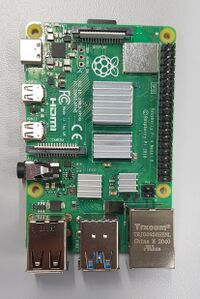
The Raspberry Pi is an SBC (Single Board Computer). It's built around a Broadcom SoC, which is an ARM Cortex A Series microprocessor. The Raspberry Pi Board contains all of the necessary components, such as the processor, RAM, storage, connectors, and GPIO pins. Raspberry Pi's hardware and firmware are both closed-source, which means they are not available for general usage. To boot the Raspberry Pi, you'll need a Debian-based Linux distribution called Raspberry Pi OS. Using Wi-Fi or Ethernet, you may effortlessly connect to the internet. The Raspberry Pi includes Bluetooth and Wi-Fi technology. Python, Scratch, Ruby, C, and C++ are the most popular programming languages for Raspberry Pi application development.
Ubuntu
In addition to Windows 10, Ubuntu 20.04 is installed on the laboratory computers in the control engineering laboratory. The computers automatically start the Windows operating system. To start Ubuntu, the F12 key must be pressed at the beginning of the boot process. This opens the start menu. In the start menu, a boot option can be selected using the arrow keys. Two hard disks are available in the Legacy Boot area. The Windows operating system is installed on the 240GB SSD and a partition with Ubuntu is on the 1000GB HDD. After selecting the HDD, confirm with Enter and the Ubuntu operating system is loaded. The password under Ubuntu is Hshl2021 for all lab computers.
We'll show you how to install Ubuntu Server on a Raspberry Pi 4, connect it to the internet, and use it remotely in this article. There are two ways to set up your Pi: with an external HDMI screen and USB keyboard, or without. We utilized the first one, which came with an additional HDMI screen and a USB keyboard.
Installation of Ubuntu on RPi 4
Step 01
In the beginning, we have to insert the microSD card into our computer.
We must be careful to install the suitable Imager program for our operating system.
When we are on Ubuntu (as operating system), we can simply run the following command to install the Raspberry Pi Imager:
sudo snap install rpi-imager
Step 02
After the installation of Imager, open the application and go to the "CHOOSE OS" option.
Now, look for the “Other general-purpose OS” option and select it.
After that, you can choose Ubuntu from a list of download alternatives. Ubuntu 20.04.3 LTS (RPi 3/4/400) is recommended for this purpose. This will work for the Raspberry Pi 2,3, 3+, and any of the 4's, as mentioned in the imager.
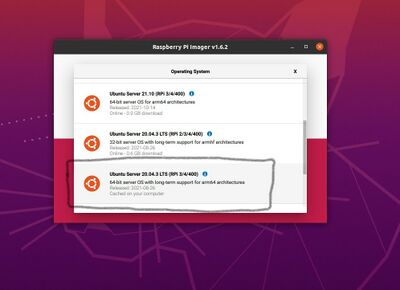
We open the "SD Card" menu after selecting the image. Then choose the microSD card that we have inserted.
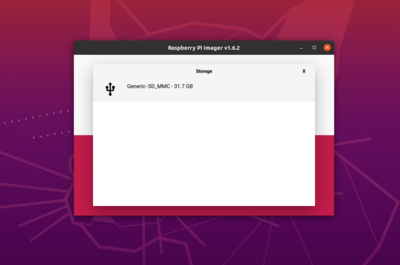
Step 03
Until this point, we have selected the right operating system and SD card. In the last step, we just click on "WRITE" option to begin the intallation of Ubuntu server in our Rpi 4. It may take few minutes and below it is shown how your screen will look like after clicking on "WRITE" and it means that we have come all good so far.
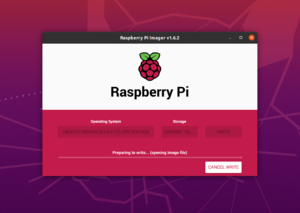
Congratulations! We have finally installed Ubuntu server completely. Now, we will configure WiFi on our Raspberry Pi 4 with Ubuntu 20.04 LTS 64-bit ARM Server.
Configuration of WiFi on Rpi 4
After working with our Rpi using Ethernet for couple of days, we wanted to get rid of connecting our microprocessor each time with Ethernet cable, so we came up with idea of connecting WiFi with it. In order to configure wifi, we need following information:
(i) Raspberry Pi wireless card name on your system;
(ii) WiFi router name you are trying to login (SSID), and
(iii) WiFi login password
Step 01
The first step is to figure out what your wireless network interface's name is. To do so, execute this:
$ ls /sys/class/net
enp0s25  lo  wlp3s0
The wireless network interface name on an Ubuntu 20.04 machine could be something like wlan0 or wlp3s0. In our case, it was wlan0.
Step 02
Next, go to the /etc/netplan directory and find the Netplan configuration files you need. 01-network-manager-all.yaml or 50-cloud-init.yaml are examples of configuration files.
$ ls /etc/netplan/
Step 03
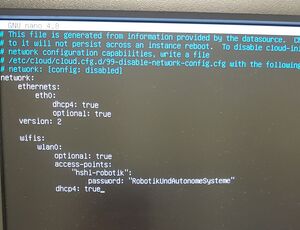
Edit network configuration file to add WiFi info:
$ sudoedit /etc/netplan/50-cloud-init.yaml
After executing this, you will see the following screen:
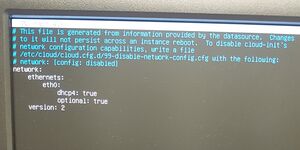
Now add the following details as shown in the image below:
Step 04
By using the ip command, we will be able to see our wireless adapter linked to the wireless network if everything went well:
$ ip a
Hence, we have successfully configured WiFi on our RPi 4.
ROS2
The creation of ROS2 was proposed to solve the performance constraints of ROS1 due to its lack of support for real-time performance.
Any robot platform's software stack requires a number of software tools, including hardware drivers, networking modules, communication architecture, and a number of robot algorithms. ROS brings all of these tools together in one place, eliminating the need for developers to recreate the wheel. ROS is more than just a middleware, and the numerous solutions and packages available for robot navigation, perception, control, motion planning, simulation, and more make it impossible to ignore.
Installation of ROS2 on RPi4
We can install ROS2 in two ways:
i) from binary packages
ii) building from source.
In this project, we installed ROS2 using Debian packages (from binary packages) on RPi 4. The installation is more convenient using Debian packages because it automatically installs all of the required dependencies. It also receives updates at the same time as the rest of the system.
Setup Sources
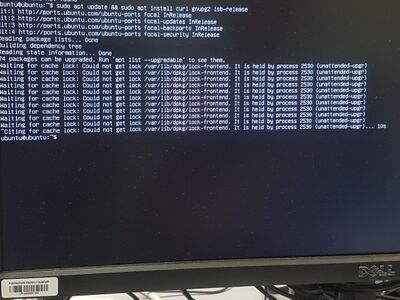
First, we will begin with 'Setup Sources' step. You might see the same error could not get lock /var/lib/dpkg/lock-frontend as shown in the image below after just running the first line of command in setup sources step.
sudo apt update && sudo apt install curl gnupg2 lsb-release
Just execute the following commands to solve this problem.
sudo rm /var/lib/apt/lists/lock && sudo rm /var/cache/apt/archives/lock && sudo rm /var/lib/dpkg/lock


sudo rm /var/lib/apt/lists/lock && sudo rm /var/cache/apt/archives/lock && sudo rm /var/lib/dpkg/lock*


configure dpkg --configure -a
sudo apt update
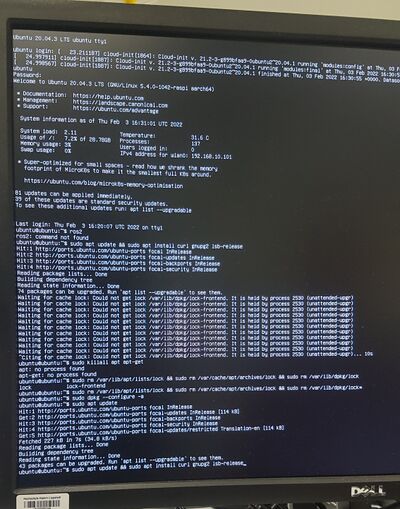
Now you can execute second line of setup sources command:
sudo apt update && sudo apt install curl gnupg2 lsb-release
then you can add repository to sources list:
echo "deb [arch=$(dpkg --print-architecture) signed-by=/usr/share/keyrings/ros-archive-keyring.gpg] http://packages.ros.org/ros2/ubuntu $(source /etc/os-release && echo $UBUNTU_CODENAME) main" | sudo tee /etc/apt/sources.list.d/ros2.list > /dev/null
Install ROS 2 Packages
After adding repository, you will have to update apt repository:
sudo apt update
One thing we have to be careful while installing ROS2 packages is that we do not need to install the command for desktop:
sudo apt install ros-foxy-desktop
Instead, we have to install the one that is not for GUI tools:
sudo apt install ros-foxy-ros-base
After this step, only sourcing the setup script is needed to be done.
Environment Setup
source /opt/ros/foxy/setup.bash
and eventually the installation of ROS 2 on Raspberry Pi is complete.
What is ROS?
ROS stands for Robot Operating System and it is an open-source platform that makes it easier for researchers and developers to create and reuse code for robotics applications. ROS is also a global open-source community of engineers, developers, and enthusiasts that work to improve, expand, and make robots more accessible to the general public. ROS is not an actual operating system but it is more like an environment. The big strength of ROS is its ability of connecting nodes together.
Why should we use ROS for robotics?
Due to the following reasons, one can analyze the advantages of using ROS for robotics:
Language-agnostic
A Python node and a C++ node can readily communicate with each other. It implies a lot of reusability and coworking possibilities. Because ROS is primarily focused on C++ and Python, several modules also allow you to use other languages. We can also install a websocket server (rosbridge suite) or an HTTP server on our robot and communicate with it using any language.
Light
ROS's core doesn't take up a lot of space or resources. In only a few minutes, we can install the essential packages and get started. Furthermore, ROS may be used on embedded computers like Raspberry Pi 3 boards. As a result, we may immediately begin a new project with minimal effort.
Packages for everything
Do you need to calculate a robot's trajectory? That is anything for which there is a package. Control the robot using your joystick? There is a package for that as well. Or perhaps you want to use a drone to map out a room? There are numerous software available to accomplish this. If you do a little searching, you'll find a plethora of ROS packages for practically every robotic application.
Great simulation tools
We require simulation tools since we cannot always get our robot to run in real time. Webots, Rviz, and Gazebo are just a few of the fantastic tools available in ROS. For educational purposes or to test in a specific context, the simulation tools can allow us to observe and utilise other robots that we do not own.
Control multiple robots
Multiple ROS masters can be used with ROS. It means that we can have a large number of autonomous robots, each with its own ROS system, and they can all communicate with one another.
Terminologies in ROS
Following are the different terms used in ROS that we come to know about them in deep while walking through tutorials.
Nodes
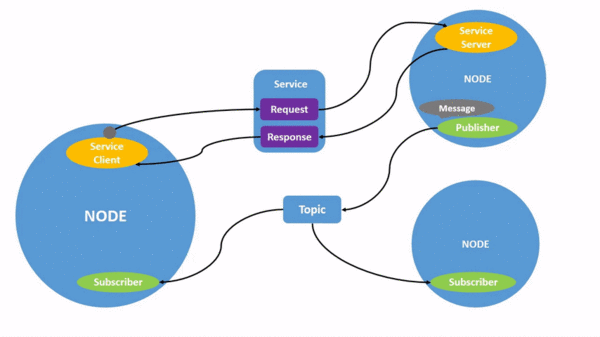
Nodes are software components that can be written in C++ or Python. They are capable of handling a limited number of jobs. For instance, reading a sensor or controlling a servo are two examples. Each node can communicate with other nodes through topics, services, actions, and parameters.
Publisher
A ROS Node can be either a Subscriber or a Publisher. A Publisher is the person who assigns communications of a certain standard Message Type to a specific Topic.
Subscriber
The Subscriber, on the other hand, subscribes to the Topic in order to receive messages whenever the Topic is updated.
Topics
ROS 2 deconstructs complex systems into a series of modular nodes. Topics are an important part of the ROS graph since they serve as a bus for nodes to communicate with one another. A node can publish data to any number of topics and subscribe to any number of topics at the same time. Topics are one of the primary methods for moving data between nodes and, as a result, between different areas of the system.
Services
Services are another way for nodes in the ROS graph to communicate. Unlike topics, which use a publisher-subscriber paradigm, services use a call-and-response model. While topics allow nodes to subscribe to data streams and receive continuous updates, services only deliver data when a client requests it.
Parameters
A parameter is a node's configuration value. Parameters are similar to node settings. Integers, floats, booleans, texts, and lists can all be stored as parameters in a node. Each node in ROS 2 has its own set of parameters.
Actions
Actions are a sort of communication in ROS 2 that is designed for long-running tasks. There are three elements to them: a goal, feedback, and a result. A client-server model, similar to the publisher-subscriber approach, is used for actions. An "action client" node delivers a goal to a "action server," which acknowledges it and responds with a stream of feedback and a result.
Package
You can think of a package as a container for your ROS 2 code. You'll need to organise your code into a package if you wish to install it or share it with others. You may easily release your ROS 2 work and allow others to build and utilise it with packages. In ROS 2, package creation is done with the ament build system and colcon as the build tool. Although additional build types exist, you can construct a package using either CMake or Python, which are officially supported.
Using the Raspberry Pi’s GPIO to control hardware components
The Raspberry Pi's row of GPIO pins along the top edge of the board is a powerful feature. General-Purpose Input/Output is an acronym for GPIO. These pins are the Raspberry Pi's physical interface to the outside world. You can think of them as switches that you can turn on or off (input) or that the Pi can turn on or off (output) at the most basic level (output). The Raspberry Pi's GPIO pins link to electronic circuits and allow it to control and monitor the outside world. The Raspberry Pi can control LEDs, switch them on and off, and run motors, among other things. It can also tell if a switch has been pressed, the temperature, and the amount of light. This is referred to as physical computing.
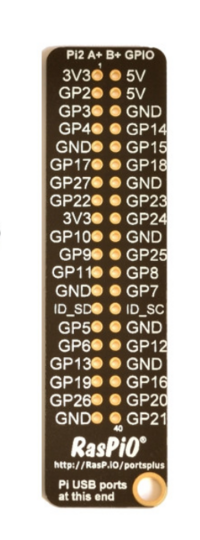
The Raspberry Pi has 40 pins (26 pins on early variants), each of which serves a different purpose. If you have a RPi pin label, you can use it to assist you figure out what each pin is for. Make that the keyring hole on your pin label is facing outwards, away from the USB ports.
1. GND: Zero volts is a voltage that is used to complete a circuit.
2. GP2: These pins can be used for a variety of purposes and can be set up as input or output pins.
3. 5V: Anything that is attached to these pins will always receive 5 volts of power.
4. 3V3: Anything attached to these pins will receive 3.3V power at all times.
5. ID_SC/ID_SD/DNC: pins with a specific purpose.
TIP: Playing with the GPIO pins is safe and enjoyable if you follow the instructions. Randomly putting wires and power sources into a Pi, on the other hand, may cause it to fail, especially if the 5V pins are used. If you try to connect devices to a Pi that use a lot of power, bad things can happen.
An ultrasonic distance sensor emits ultrasound pulses that are undetectable by humans and detects the echo that is returned when the sound bounces off a nearby object. The distance from that thing is then calculated using the speed of sound.
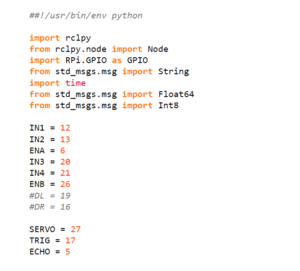
Two GPIO pins (one for echo, one for trigger), the ground pin, and a 5V pin are connected to the circuit. You must know which GPIO pins the echo and trigger are attached to in order to use the ultrasonic distance sensor in Python. First, we initialize the GPIO pins in our program.
Here,
- the echo is connected to pin '5'
- the trigger is connected to pin '17'
- the servo to pin '27'.
GPIO.setmode(GPIO.BCM) = set up GPIO Broadcom chip-specific pin numbering
self.p = GPIO.PWM(servo, 50) = When RPi configured for software pulse-width modulation, each pin generates a square waveform with a configurable duty cycle and frequency
self.PWMA.start ( ) = hints left wheel speed
self.PWMB.start ( ) = hints right wheel speed
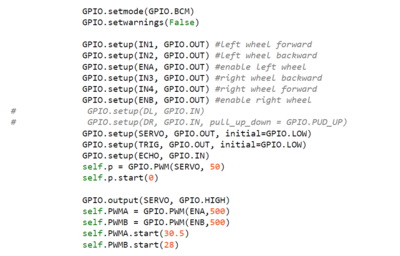
Illustration of the robot with UML diagram

Summary
This whole article conveys the information related to one specific part of this project. From the name "Raspberry Pi and ROS2", we can get an insight of what can be included in this section. In this article, I discussed on difference between Raspberry Pi and Arduino, Ubuntu as an operating system on our microprocessor, how we can begin with ROS2, why we need it, how it helps us and using Raspberry Pi GPIO pins to control the hardware.
Since, the above mentioned things are not the only ones what I participated in doing. We worked as a team on this project and achieved the overall result together. Along with above mentioned sections, I was also able to work and sharpen my skill of programming in Python and C++ language by programming Raspberry Pi 4 using ROS2 and the simulation on Webots .
Self-reflection
First, each of us was obliged to practise the tutorials of ROS2 and Webots in order to have a good command on these two tools. After walking through the tutorials, I was able to build a similar robot like Alphabot on Webots that I integrated with ROS2 later. We can also control the robot using Keyboard along with allowing it to drive autonomously on Webots. Then, I started programming Raspberry Pi 4 with the integration of ROS2 in order to make our AlphaBot to be able to detect obstacles and drive autonomously.
In short, I got a good grip on following tools by working on this project:
- Ubuntu, family member of Linux OS
- Credit-card sized computer: Raspberry Pi 4
- Robot Operating System
- Programming in object-oriented language, Python and C++
Outlook
Every day, technology evolves and expands. It's also affecting how individuals conduct their jobs. Robotics is one of the technologies that is transforming the global industrial landscape. Patience, the courage to work through mistakes, and problem-solving skills are all required to thrive in robotics. And I was privileged to work under the supervision of the professors in order to get into this world, explore my abilities, realize my mistakes and improve them. Internship is the point where we get a chance to implement all of our skills that we learnt previously in a real and professional world. Around the world, robotics is forging new ground in learning approaches. It is imperative that we prepare ourselves for the changes that will occur in the future in all facets of our lives, whether personal, educational, or professional. And I am looking very forward to playing my part in it in near future.