Raspberry Pi: Unterschied zwischen den Versionen
Keine Bearbeitungszusammenfassung |
|||
| (Eine dazwischenliegende Version desselben Benutzers wird nicht angezeigt) | |||
| Zeile 13: | Zeile 13: | ||
The Raspberry Pi is a single computer the size of a credit card. It features an ARM/Broadcom SoC with a GPU, RAM, and wireless and cable communication options. In some ways, it's that straightforward: the Raspberry Pi is just a small computer. However, it is not so straightforward in another manner. The Raspberry Pi is a very adaptable platform that allows you to build whatever you desire. | The Raspberry Pi is a single computer the size of a credit card. It features an ARM/Broadcom SoC with a GPU, RAM, and wireless and cable communication options. In some ways, it's that straightforward: the Raspberry Pi is just a small computer. However, it is not so straightforward in another manner. The Raspberry Pi is a very adaptable platform that allows you to build whatever you desire. | ||
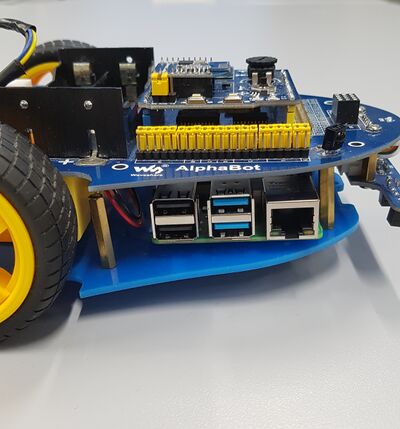
Initially, we got the AlphaBot with an Arduino attached to it and then we replaced Arduino with a Raspberry Pi 4 and used or programmed it accordingly. In this article, the idea of using Raspberry Pi 4 instead of Arduino IDE with Alphabot is introduced. Like, how different tools make the Raspberry Pi 4 to control and work with Alphabot. Before we go further, let us take a closer look at the difference between these two boards, Arduino IDE and Raspberry Pi. Then, | Initially, we got the AlphaBot with an Arduino attached to it and then we replaced Arduino with a Raspberry Pi 4 and used or programmed it accordingly. In this article, the idea of using Raspberry Pi 4 instead of Arduino IDE with Alphabot is introduced. Like, how different tools make the Raspberry Pi 4 to control and work with Alphabot. Before we go further, let us take a closer look at the difference between these two boards, Arduino IDE and Raspberry Pi. Then, the installation of required softwares and role of GPIO pins to control the hardware will be explained. | ||
=== Arduino === | === Arduino === | ||
| Zeile 49: | Zeile 49: | ||
== Project planning == | == Project planning == | ||
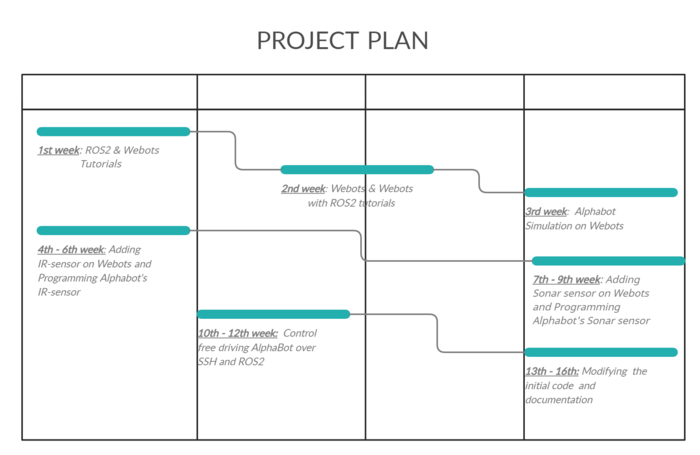
[[Datei:Project Plan.jpg|left|mini|700px|Abb | [[Datei:Project Plan.jpg|left|mini|700px|Abb. 4: Project plan]] | ||
<br clear=all> | <br clear=all> | ||
Aktuelle Version vom 20. März 2022, 00:31 Uhr
Autoren: Fawad Murad
Betreuer: Prof. Schneider
Art: Praxissemester
Projektlaufzeit: 02.11.2021 - 20.02.2022

Introduction
The Raspberry Pi is a single computer the size of a credit card. It features an ARM/Broadcom SoC with a GPU, RAM, and wireless and cable communication options. In some ways, it's that straightforward: the Raspberry Pi is just a small computer. However, it is not so straightforward in another manner. The Raspberry Pi is a very adaptable platform that allows you to build whatever you desire.
Initially, we got the AlphaBot with an Arduino attached to it and then we replaced Arduino with a Raspberry Pi 4 and used or programmed it accordingly. In this article, the idea of using Raspberry Pi 4 instead of Arduino IDE with Alphabot is introduced. Like, how different tools make the Raspberry Pi 4 to control and work with Alphabot. Before we go further, let us take a closer look at the difference between these two boards, Arduino IDE and Raspberry Pi. Then, the installation of required softwares and role of GPIO pins to control the hardware will be explained.
Arduino

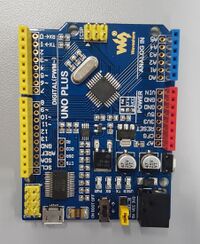
Arduino is a development board that uses a microcontroller. Arduino UNO uses the ATmega328P microcontroller, which is based on Atmel microcontrollers. The Processor, RAM, and ROM are all contained in the Microcontroller on the Arduino Board (such as the ATmega328P). Supporting hardware (for power and data) and GPIO pins are included on the board. Arduino was built from the ground up as open-source hardware and software. The hardware and software of Arduino are both easily accessible. There is no need for an operating system because it is a Microcontroller. To connect to the internet using Arduino, you'll need an extra module or shield. In the case of Arduino, there is no wireless connectivity (at least on board). C or C++ programming languages can be used to programme Arduino.
Raspberry Pi

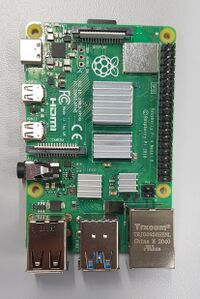
The Raspberry Pi is an SBC (Single Board Computer). It's built around a Broadcom SoC, which is an ARM Cortex A Series microprocessor. The Raspberry Pi Board contains all of the necessary components, such as the processor, RAM, storage, connectors, and GPIO pins. Raspberry Pi's hardware and firmware are both closed-source, which means they are not available for general usage. To boot the Raspberry Pi, you'll need a Debian-based Linux distribution called Raspberry Pi OS. Using Wi-Fi or Ethernet, you may effortlessly connect to the internet. The Raspberry Pi includes Bluetooth and Wi-Fi technology. Python, Scratch, Ruby, C, and C++ are the most popular programming languages for Raspberry Pi application development.
Software requirement
- Ubuntu 20.04.3 LTS (RPi 3/4/400)
- Robot Operating System 2 (Foxy Fitzroy)
Hardware requirement
- Robot (AlphaBot)
- Raspberry Pi 4
- HDMI cable (for connecting RPi with Monitor)
- Network cable
- Network switch
Project planning

Installation of Ubuntu Server and ROS2
Overview of ROS
Using the Raspberry Pi’s GPIO to control hardware components
Illustration of the robot with UML diagram

Summary
Softwares
- Ubuntu 20.04.3 LTS (RPi 3/4/400). To install Ubuntu Server 20.04.3 LTS on a Raspberry Pi, please use this guide.
- Robot Operating System 2 (Foxy Fitzroy). To install ROS 2 Foxy on a Raspberry Pi, please use these instructions.
Demo
The code can be run straight from the SVN repository: https://svn.hshl.de/svn/Robotik_und_Autonome-Systeme/trunk/Projekte/AlphaBot_PI_ROS2/ .
In order to know how the code can be executed from SVN directory, please go through these instructions .
Weiterführende Links
- ROS2 Tutorials.
- Difference between Raspberry Pi and Arduino.